Step 1: Beg Explain patiently to professional carpenter husband over several months that current compost bins are old and too small and in the wrong place. Paint dazzling word pictures of abundant food and rich soil that would result from beautiful new compost bins.
Step 2: Research. Turns out it’s not easy to find a good set of plans! Most of the compost bin instructions out there are for recycled pallet bins or a couple of other common designs that were dismissed by said husband as either too ugly, too expensive to build on our budget, or lacking in lateral or other significant supports. We did end up finding these useful plans from the City of Vancouver, and this became our base idea. I figured that if these plans would keep Vancouver compost dry in the winter monsoons and safe from raccoons and other city critters, they were good enough for us.
Step 3: Take stock of existing supplies and recycle as much as possible. Can you believe the fr#@%!*g price of wood these days?! Skipper recycled our previous deck stairs and some cedar posts that he rescued from a job site a year or so ago. He salvaged as much of the old bin’s cedar as he could. We bought a small amount of pressure-treated wood for the base, a small amount of cedar for the front pieces, some hardware cloth to rodent-proof the bins, and a small number of assorted screws and other bits and bobs, and we’re still into this for almost $300. Hence the large number of online plans for recycled pallet compost bins!
Step 4: When the good weather arrives—start building!
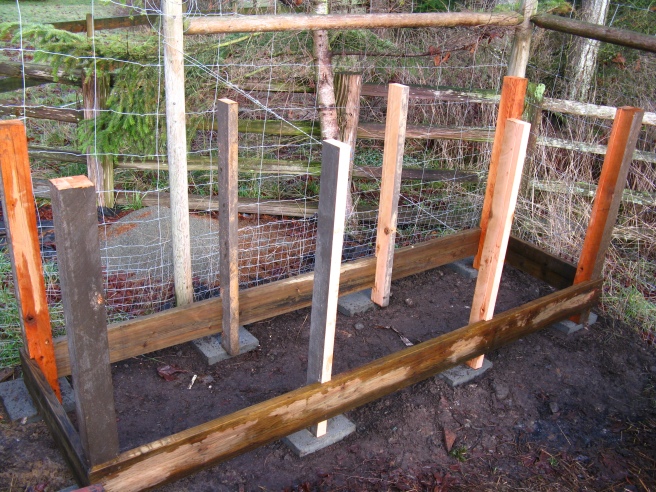
Before:


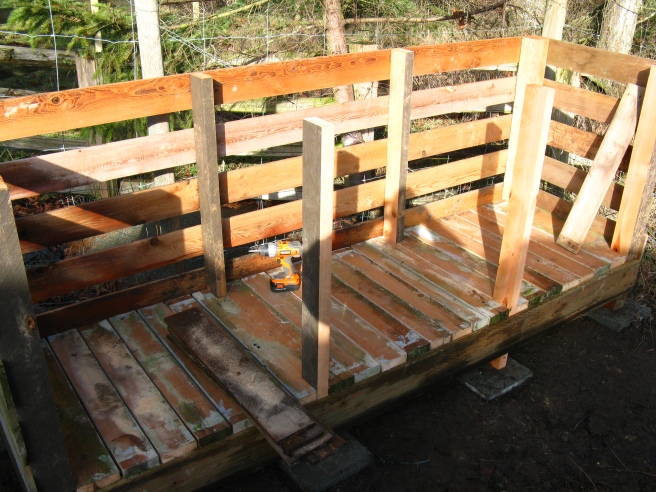
We decided to raise the bins off the ground for both rodent-proofing and to make shoveling a little easier on the back.


The details…


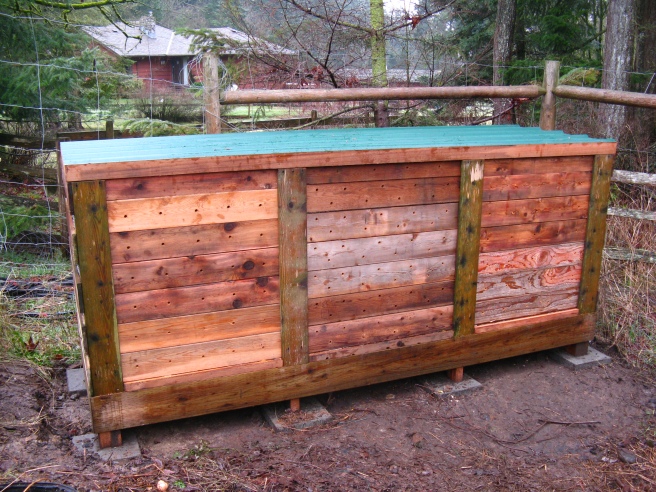
It’s our equivalent of Rob at OneStraw‘s Compost Bin of Dreams. It’s hard to convey through these photos just how sturdy and stable the whole thing is–ready for many tons of compost to be produced in the years to come. The Skipper is pretty psyched; he’s even taken to pilfering all the fruit peels shed by his crew at work each day and bringing them home in a bucket “for me”. 🙂 Most importantly, the bin’s new location clears the way for the chicken coop, and the bigger size anticipates the fabulous chicken manure and litter that will be piling up in the not-so-distant future.
Apologies for the long hiatus between posts recently. As you can see, we are now Making Progress in a big way on our spring plans. I have lots more to report on, so will be trying to post more often. Stay tuned!

Hi Toni, welcome back! Wow, I can’t imagine having to keep the compost dry. Around here the biggest problem is keeping track of watering the darned thing in the summer. Your new bin sure is a beauty though. : ) D
Looks GREAT! Congrats!
Thanks Rob–your compost bin and building posts (along with the blog generally) have been pretty inspiring. I’ve been shredding my fall/winter prunings like crazy! 🙂 Our soil is pretty similar to yours, your basic industrial backfill, so I’m hoping that regular mulch and compost will make a big difference over the coming years. Thanks for sharing all your learning and research on line for the rest of us to benefit from!
Deb, we definitely dry out in the summer (and welcome is the drought at that point!) too. But this time of year, dry, sunny weather is only a far away dream…sigh. 😉
That is a thing of beauty! I love your idea of using screws to keep the boards spaced – and I love how the front boards can be added and subtracted! Me want!!!!
Thanks! Skipper deserves the credit for the design of the front panels–they look gorgeous, but I have to admit that I wasn’t sure that air circulation was an issue given the huge ventilation on all the other sides. I have to be careful what I ask for–Skipper can really take an idea and run with it! (and that’s not a complaint. 🙂 )
gorgeous bin Toni! Marc built a pretty good one at the farm but yours tops his any day. It’s lovely! When do your chickens arrive?
Thanks Amanda–and yes, let us know if you’re ever sailing our way! More info to come on the chickens… 🙂
I love all that you two are doing to the property and can’t wait to come and see it all for myself. Jealous that my hubby was there and got to see it all before me. I too have been searching for “the perfect compost bin” and now thanks to “Skipper and Toni” I will one day soon have one too. Love your blog and I log in at least twice a week to read and reread as you have done so much research that takes soooo much time (thank you for that). Alain might just have to steal some of your ideas Skipper!
Rhonda, great to hear from you! I’m so glad you’re enjoying following along on our adventures and learnings–now if only we had your piece of property! 🙂 I hear we’re not the only ones who’ve been busy lately, too; I’m looking forward to seeing your changes too!
Well I searched for “the ultimate compost ben” so I guess I shouldn’t be surprised to find your work of art! What a beauty! Hope to have one similar soon. Thanks for the inspiration.
Wow! Very cool! Thanks for posting pics of the compost bin. I don’t think mine will be as complicated, but I’m going to study yours and come up with a smaller version for my Texas garden. Thanks!
Thanks for this inspirational and detailed compost bin post! We’ve had several over the years, and this looks like the best combination I’ve seen.
Love this compost bin. Great job!!!
Amature question…
Why three bins?
I’m assuming…
One to hold compost material – one to hold green stuff and one to hold brown stuff for future use?
Thanks…
Pat
Hi Pat,
The three bins are for different stages of compost. You start in bin 1, layering until the bin is full. Then, after a time, the pile needs to be turned over, so into bin 2 it goes. Bin 1 can then be refilled. After a while, when bin 1 is full again, bin 2 gets turned into bin 3, bin 1 to bin 2, and then bin 1 filled again. At this point, we hope that the pile in bin 3 is fully composted and ready to use.
Good question, and there’s lots more info online about why and when to turn your compost piles, and how long they need to sit until they’re ready. Have fun!
Your design is the best I have seen! Do you think making the middle dividers so that they slide out would make turning it and moving to the next bin easier?
Reblogged this on FEATHERLY FARM and commented:
Is this cool or what? When I get ready to build a “permanent compost bin, it will probably have a concrete paver floor…but this bin is the most awesome I’ve seen so far!
Nic looking bin but with it begin off the ground how do worms etc get in to it. Also as was mentioned above but not answered is compos needs to be keep moist. Condensation from the metal roof won’t be enough.
Hello, almost finished building my compost bins, just waiting for someone to give away roof material on craigslist…..Is there any way to share pictures here?
Wow, I like that you got him to do the work!! Great article! And the bin is great too!
This is exactly what I am looking for. Thanks for sharing.
Reblogged this on Rainbow Worms Composting and Organic Gardening and commented:
This was such a quality Post I thought I would Share
Is there anyway I could get dimensions from you and a supply list? I can guess but actual numbers would be awesome.
Hi–can’t really do a supply list; we made lots of this with salvaged materials. The key is to make bins that are at least 3’x3’x3′ each, so that you can fit at least 1 cubic yard of material in each one. You need at least a cubic yard of fresh material to heat up enough to make good compost. Good luck with your project!
Can one make good compost with just leaves and grass? Should I assume that weeds should not go into the compost pile?
Hi, thanks for writing this up, looks great. Also, the link to the plans is very, very helpful. Working on de-constructing a big watch tower so I can repurpose the lumber for this project. Thanks again! Guppy
I was just wondering, around where I live we have to be careful about wood being left on the ground, because if there is a board left on the ground with in two days it becomes a termite buffet. And they seem to do a LOT of damage to anything left with ground contact in no time. Do you not have to worry about termites in your area or do you treat the wood with something first.
Wow, i love the bin. Great design. I am in the middle of making my very first compost bins and made a rookie mistake of running the lumber from side to side instead of front to back. Well done you-it will make turning it much less jarring! Thanks for all the tips,I will be referring back to your site again
Wow what a great composter. Definitely going to build one of these…
Thanks for sharing such informative post.
First off, beautiful compost bins! I’m curious why you have floor boards in the bins; wouldn’t that keep the worms and other decomposes out?
Great Job ! Just what I have been looking for ! A wise man once told me, “look at the lazy guy’s method for ideas ;he has been practicing all his life “. With that said, this “lazy guy” might suggest a thought – how about installing the hardware cloth ,immediately after setting the posts and floor and before the side planks ?It would seem to make the hardware cloth installation a one shot deal ? Just gilding the Lilly on an otherwise GREAT job !
Mat C.
Wonderful Job, Composting is such an important ingredient in the soil. Now I have to see if I can get some good wood. Thanks for sharing. terrysblogsite.com
This is exactly how my grandfather built his bins and he turned out the best compost (and garden) I’ve ever seen. I’m glad you posted this because it saves me the effort of having to re-draw plans and a bill of materials from memory!
Also, whenever he would fill or turn over the compost, he stood a 4″ PVC pipe up in the center of the bin and filled the bin around it. After the bin had sat for two or three days and everything had settled and compacted a bit, he would pull the pipe straight up out of the center. It increased the airflow throughout the composting mass. The fun part is that as the compost heats up, you can see it steaming off in the morning. If you put your hand in the hole, you could feel the heat and sometimes, it was actually hot enough to burn! I seem to recall that he said that when we didn’t see the morning steam any more, it was time to turn it into the next bin.
The major component of the composting material came from the neighbors horse manure piles so I think we’re going to do something like that here. Leaves are in short supply in the middle of the desert!
In any case, thank you for posting up. Very much appreciated!
–Wag–
Superb, many thanks for this! A modest replica of your ‘backyardfeast’ bin will soon occupy a corner of our backwoods home in Southern Norway. Work begins today with oldest son, Thor-Jakob, in tow…will report on results :). Cheers, Løbergs
Looks beautiful, but I’m wondering what’s to keep the little buggers from chewing their way in. I guess they’ll have trouble getting an edge to chew on? I’ve got the same problem, but I’m thinking something much simpler and uglier with fence panels and hardware cloth.
Excellent tutorial. I have one built with pallets but am going to use your plan for a new permanent one. Thanks for posting.
Hello, These bins look great. what would you say the cost of the project was?
dang! ya’ll. Das sum gooden composter
It is truly beautiful. I understand it is off the ground to make it easier on the back. But I agree with Doug Jefferson that the pile needs moistrure and I don’t see that the metal cover gives it enouigh. Could you place framed up hardware cloth on top? Then you could keep out critters and allow moisture. Of course that would end up rotting your floor boards sooner. Is this a catch 22?
I’m not sure if it is mentioned in previous comments, but the link to the City of Vancouver’s composting plans is broken. I just used the search box while on that site and located it. (I’m also on a mobile device and for some reason it still wouldn’t download for me) BUT! There’s a ton of helpful information on that website! I saved the City’s website for future use. Thank you!!!
Looks awesome! Daydreaming of building one of my own someday soon 🙂
Nice looking construction and looks quite efficient. I built a similar style bin for my vermiculture friends, worms. About the only difference is I made my escape proof so the worms wouldn’t go on vacation and I used 2 inch styrofoam to insulate the bin from heat and cold. Much of the foam was salvaged from packing filler so it was not sent to the landfill. In fact it was so efficient that I had more worm castings than my garden could use. Also a word to the wise. My worms got spoiled on fruit peals and skins and tended to eat desert before their dinner of non fruit waste, potatoes and other non sweet food scraps. They would have a half of watermelon rind gone in a day or so. Spoiled little brats !
Any reason why you use cedar?